|
 |
Configuring your Small Business Network for External Access to Tempurity™ ServersIntroductionThis document describes how to use the Tempurity System to monitor temperatures from outside a small business network. The directions assume that your Tempurity Server, the computer serving as the temperature collector, is inside your network. You will be able to define and send alarm notifications from any computer either inside or outside your network. This document is targeted towards customers that have a single gateway router. For more detailed information see the Tempurity System User’s Guide, and the Tempurity Quickstart Guide from the download section of the Networked Robotics web page. RequirementsTo collect temperatures you will need at least one Networked Robotics NTMS4 network device and at least one Networked Robotics digital temperature probe. To collect temperatures from multiple NTMS units, in most small business, you will also need a router. Routers can be purchased at electronic stores such as Best Buy for under $100 and can be either wired or wireless for use with Tempurity. If you wish to connect your temperatures wirelessly, you will also need a wireless bridge such as the LinkSys WET11. Figure 4 shows an example wireless configuration. Small Business Router and Network BasicsMost routers have a single external network address, called an IP address, and multiple internal addresses. All connections initiating from outside the network must be sent to the external IP address. The Internet Service Provider (e.g. Comcast or Sprint) assigns you this address from a range of addresses allocated to their organization. Usually it is automatically assigned to the router when you turn the router on. Network messages coming in from the outside are usually discarded. Because the internet sees only one external address, and there are many internal addresses, the router does not know to which internal address/ computer the message should be sent. You will need to tell the router that external messages for Tempurity should be sent to the internal computer's (Tempurity Server's) IP address. The Process of ConfigurationThe steps needed to enable external access to Tempurity on your network are: 1) Determine your router’s external address Determine your Router’s External AddressConnect to your router according to the instructions in the router user’s guide. Usually you will do this by entering the router's default IP address, usually 192.168.x.1, into a web browser. Enter the router username and password as per the router's user's guide. On Linksys routers the “Status” screen is used to
determine the external IP address, shown below on the line “Internet IP
address”. This will be required for every access to your Tempurity Server
from outside of your network. You should record this address.
If you have another kind of router, you can click here for instructions on port forwarding for other router types. Configuring the Router for Access by TempurityYou will use the router’s port mapping procedures to allow external access by Tempurity. On LinkSys routers this function is enabled in a screen called Applications and Gaming (Multiplayer game servers require the same procedures to allow connections by the outside). If the Tempurity Server is inside your small business, you must enable connections from the outside to the Tempurity Server. You will need to open the Tempurity Monitor Port address on the router, which is always port 3010. In the router application and gaming configuration screen above there will be one line where the port address is 3010 and the IP is set to the internal IP address of your Tempurity Server computer. If the Tempurity Server is inside the network, entries in the Tempurity Server Configuration Utility would specify connections to NTMS units using the internal addresses of the router. Below shows the addresses that would be used to collect temperatures from 8 monitored devices on two NTMS units.
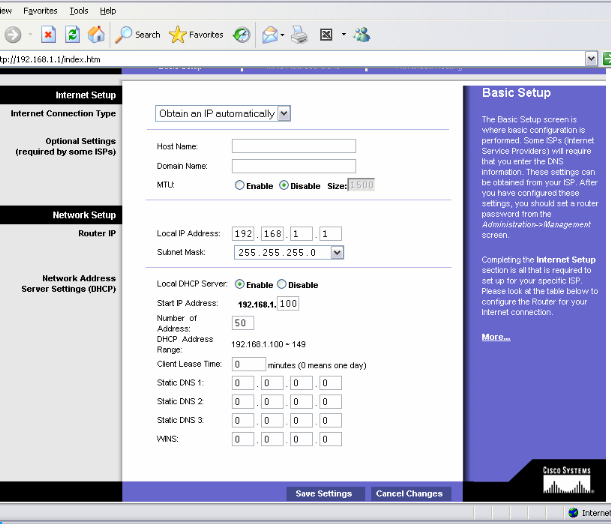
Preventing IP Address Conflicts with the NTMSYou must manually assign IP addresses to each Tempurity Server or NTMS hardware unit that is within the range of IP addresses allowed by the router. In a typical small business network IP addresses of e.g. 192.168.1.1 to 192.168.1.255 would be allowed by default. The router hands out addresses to computers on your network in this range using a system called DHCP. You should ensure that the router does not hand out an address that is already in use by an NTMS unit or a Tempurity Server. In the Linksys screen below the Start IP address, and the number of address field determines that 192.168.1.100 through 192.168.1.150 will be handed out by the router. Any other address except 192.168.1.1 (the router’s address) would be able to be assigned to an NTMS.
Changing External AddressesWhen the router is set to obtain an IP automatically, (see the figure above), every time that the router is restarted it may be assigned a new IP address from the internet service provider. External monitoring by the Tempurity System requires that this address be a known, fixed quantity. To ensure this you will need either a (1) fixed IP address for your router, (2) a universal power supply to prevent router reboots, or (3) the use of dynamic DNS to ensure that the router's IP address is known. The use of dynamic DNS is recommended although detailed instructions for using dynamic DNS are beyond the scope of this document. In general you will need to (1) ensure that your router supports dynamic DNS protocol and (2) register with one of the router company's dynamic DNS providers. |